Detailing World Forum banner

1970's Prefab replacement Garage

Tags
#garage
10K views 35 replies 8 participants last post by  vsideboy  
#1 ·
Long term lurker, but now hoping to get your collective advice and lean on some of your expertise in replacing my original 1970's prefab garage with a new built unit, and keep you updated along the way.

Plan is destruct the current prefab concrete garage unit, which I'm 90% has asbestos roof tiles and quite possibly asbestos concrete in the concrete bricks themselves. Its looking old and tired but has stood up well given its original install we think some time 1978, but does let in water at a couple of places despite my efforts to prevent it. Adjacent wall next to it to the gate will come away, with existing concrete pad removed.

New garage to be built in its place, measuring 5m x 7m but might stretch to 8m length depending on affordability. New Roller door to front, rear pedestrian access and apex roof to give a little more height inside. Getting conflicting information between architects / builders in terms of whether planning is needed, but I'm in touch with the local authority to confirm one way or the other.

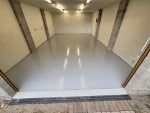
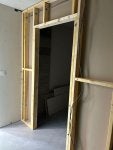
Not many plans for interior at present, other than maybe a stud wall to section a portion off at the rear for some workshop space and a proper bench. Will paint the walls initially, but may board and skim the walls at some point. Would like epoxy floor, but haven't decided and will focus on getting the building up and weather tight in the mean time.

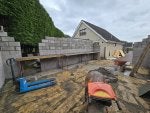
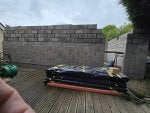
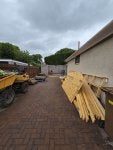
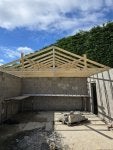
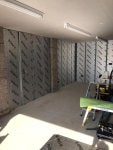
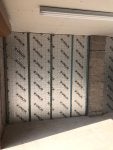
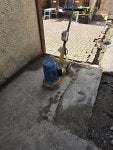
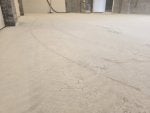
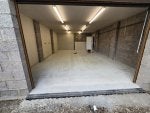
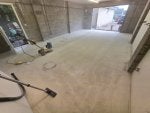
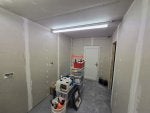
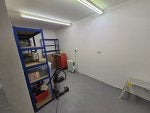
Pictures as is / before i do anything else.....


Image

Image

Image

Image

Image
 
#4 ·
Remarkably given the age and evident lack of any real maintenance, its still pretty weather tight, with only the slope on the floor (despite my attempts at resealing the door seal) where it lets in any water - other than a small hole in the roof where the panels have been replaced where if the wind and rain are exactly right a dribble gets in.
 
#3 ·
So, wee short update;
Started boxing up the odds and ends that inevitably collect within a garage whilst waiting on the plans etc being drawn up. The small hut at the back of the garage needs some work for it to survive the winter, nothing major in here just garden bits and feed etc for the kids rabbits. This will be relocated to the other side of the house to retain some weatherproof storage next month, along with the rabbit hutch.
Plans have been drawn and sent off for initial planning application. New garage will be 140mm block work, with tiled roof, and have confirmed that it will be 5m x 8m which should give a good space for what I want. Concrete floor will be replaced to meet the new build, and have discussed the options of insulating the walls at least with the builder who has suggested 100mm insulation and provided a cost. As this would likely cause some additional work when submitted thru planning with thoughts that the council would request further insulation and potentially a heat source, we've elected to get the garage built and then look at insulation.
Keen to get the garage built this year now and see how the size feels before making more plans - so many options for layouts, lighting, floor finishes, storage units etc. Anyone been on a similar journey got any advice?
Image
 
#7 ·
Not much in progress to update really, but all plans approved now and waiting for the builder to start. I've been and picked out the garage door, rough cast chips (pictured)
Image

Image

, and the builders trying to get roof tiles to match the house, Redland Caledonia if anyone knows of a pallet laid about, seemingly they might be discontinued a long while back.

Gone with a Hormann electric roller Door in a golden oak finish to match the house doors (hopefully). Had to help the old dear next door deal with her Garolla door blowing out in the recent winter weather (refusing to call it a storm or give it name like the media - anyone else think that winter weather sounds much worse and over dramatised with a name?!) So been put clean off them. Visited a local supplier who priced up the Hormann. Not as dear as I'd initially thought and I want this to last without any grief. We're at the end of a long wind tunnel like street at times, and although a sectional door is likely more sturdy I want to save on interior storage so have elected to go with a roller.
Sorted out the shed today and installed some BigDug racking which my garage has been kitted with for the last few years. Most of my stuff lives in IKEA boxes, so getting them shifted out next. The loose stuff and dismantling the racks will need more boxes and likely take the time.
Will get some pictures up to follow, but will likely leave the car cleaning kit in there with the car until the builder gives me a definitive date for starting, but looking likely it will be April 🤞🏻
 
#8 · (Edited)
Image

Few picture of progress on emptying the garage.
Kept the car washing bits, toolbox and a few other 'essentials' until nearer the time for it being dismantled.
Been looking at storage ideas and options for lighting and flooring online.
Budget will likely determine what I go with, and may end up with some short term options until funds allow. I'll have to do some landscaping once the build is complete, so until I get prices for that there will be no orders going in 😞
Image
Image
Image
Image
 
#11 ·
Iv got a similar garage in the back garden which I wish to remove and build a wooden shed/garage down the side of the house.

Whats your plan for have the old garage taken away?
I had the option to dismantle myself, but not knowing how it went together, plus the blocks being reinforced as @vsideboy has said, I've taken the lazy option of having the builder dismantle and remove it.
Its slightly more expensive from the outset, but he will get better rates for skip hire and I'd have to rope in mates etc so was easier all round to let him sort it while I do the overtime :geek:
 
#13 ·
yeah i managed to get rid of my concrete (potentially asbestos) roof sheets about 10 years ago thankfully. Went to the tip, asked what the process was, double bagged all the sheets while wearing mask and ppe, got it all safely to the tip, guy opened the asbestos skip and tons of dust and stuff came blowing out of it, loads of stuff not bagged in there. Absolute shambles. Was so angry.
 
#15 ·
I got rid of my roof sheets last year. Don't think they had asbestos in but council won't take them unless bagged. Problem with our council is, they like to make it difficult, in my eyes that just encourages fly tipping. Council provide the bags which are tiny, so only good for loft insulation type asbestos.

So, I booked them into a tip in the next county using a mates address. Really easy, book a time, sheets had to be wrapped in plastic. Turned up, guy pointed us to a red skip with a door right at the end, he didnt even check it was bagged or taped.. Lobbed them in, job done.
 
#16 ·
Image

Image

Image

Image

Image

Image

Work has finally started on the garage, after a last bit of work to pull up some of the decking at the rear. Electrics disconnected but as the feed from the consumer unit is shared with the summerhouse I've had to terminate in a JB for now, meant a run to Toolstation but I'm sure that won't be the last.
Decking has been in as long as we have so didn't take a lot of persuasion to remove, surprising to see some of the big beams crumbling in your hands but the rest will get lifted once garage is in and we decide about paving.
Wee wall been taken down and the rabbit has flitted to the other side of the house, likely permanently but had to call in the big guns to shift the hutch as it weighs a bit more than the Mrs is capable of handling 😂
Builder juggling finishing his last job and starting the garage so left one poor lad to break up the floor which is original. No membrane had been used before laying and it turns out it's been laid whilst compensating for the gradient of the ground not being levelled first. 5inch thick at the rear and over 8 inches at the door. Now that's up we're waiting on getting the skip changed out before the rest comes down. Materials should start arriving next week.
Been looking at flooring options and fancy epoxy resin but waiting on prices for install versus DIY kit.
 
#18 ·
Image

Image

Image

been a bit of progress since the last update.....The building has commenced!


The old garage came down straightforwardly, the asbestos sheets were bagged and sealed up, and although still on site came off easily once the holding bolts were removed. Digging out the existing floor didn't prove easy though, the concrete had no barrier beneath and was 7" thick at the rear but thankfully only 5" thick at the front. Took the two lads 2 long sorry days to break it up, but after 7 skips it was all gone.
Groundworks began then which revealed a few surprises. The builder reckons as we're at the end of the street/estate that whatever debris and scrap has been left has been buried in the back garden, some beneath the garage too. black iron drain covers, steel rebar, floor joists, and various rubble were found. Due to the pedestrian footpath on the boundary, whilst digging the foundations, we discovered that an enormous amount of concrete supported the path. Not wanting or needing a council bill for repairing it we took the reluctant decision to move the garage inside the boundary by nearly a meter. This didn't fit with the image I wanted but was the lesser of the two evils, and less cost than having to re-support / rebuild the path if it had subsided. This did however reveal that the mono-block patio to the back door is the most recent of a number of attempts at landscaping. beneath the block paving is the requisite sand layer, albeit over twice what you'd expect. This sits on a thick layer of concrete, which sits on more sand, with slabs underneath. This will all need digging out at some point given the floor level of the garage relative to the driveway. That explains why there is a step from the drive to the patio, something I'd never really considered why.
As the driveway is mostly mono-block, the builders have been really careful not to cause too much damage, and have been great at sheeting it out for moving the heavier stuff around. this had meant doing the bulk of the work with a mini digger and loader, which added a bit of time but it has been worth it so far, although I wasn't the one doing the lifting and moving!
Image

Image
 
#19 ·
Haven't really kept on top of this as I had intended so will drip feed some pictures in of the progress up till now;

The guys did an amazing job of laying the concrete floor, really cant stress how happy I was with the finish once it had cured properly. Everyone has asked if it was power floated, but I watched them do the job with handtools and experience clearly worth its weight in concrete!

Brickies came and went in, waiting for the requisite number of courses to settle, working amongst other jobs and battling the non-existent summer. The builders made light work of the roof once the brick was in place and there was a wee delay in proceedings whilst we waited for the lintels to arrive given the specification required from the council. Once here they were slightly narrower than the bricks, which would cause some additional finishing to be needed down the road for the door.
 

Attachments

#21 ·
We got the doors fitted once the roof was on and the gable ends were finished by the brickies . After some deliberation and discussions with local suppliers, the builders and wandering round looking at neighbours garage doors like a weirdo I decided upon an insulated Hormann Rollmatic with electric operation. I've been really impressed by the door although the installation isnt quite finished (waiting for the roughcasters to do their bit). We went for a standard PVC rear door, and I didn't want any windows. In between times the builder cracked on with insulating the ceiling, and sheeting it in, along with fitting the strip lights. These will be a temporary arrangement whilst I get the inside sorted how I want it, as I had them originally bought for the garage. I'll hopefully replace these with an LED fitting of some sort.
Image

Image

Image

Image

Image

Image
 
#24 ·
Been a while since the last update but theres been lots of progress. Once the ceiling was finished and wired up, I wanted to split the lighting circuit in two, which I wished I had done in the first place but the builder had pressed on and done for me during the ceiling install. This meant making some holes in the ceiling but was worthwhile. Next, I pressed on with running in the electrics for all the sockets and externally lighting that I wanted which needed done before the walls were sheeted.
I had always intended on making a partition wall, with sliding door to create a small workshop area at the back, hence the number of sockets, and I also hate trailing cables. A pet hate of the previous garages I have had was having to run extension cables so I've probably gone OTT with the sockets but better looking at them than for them.
The walls were insulated and sheeted next, along with installation of the partition, with how I visioned the garage now starting to feel a lot more real.
 

Attachments

#26 ·
Next was the flooring. I deliberated for a long while about the flooring. Reading numerous posts, and watching numerous videos on the pros and cons of paint Vs epoxy Vs tiles. I got a few quotes for tiles, epoxy coatings and even visited a local truck yard who the builder had proposed where they use Coovar floor paint which was what they used. In the end I decided against a self applied epoxy pain for the floor. Then the rabbit hole of how to prepare the already very good concrete floor to take the paint. I toiled for days with PVA sealing the floor, or grinding the top layer of dusty concrete which is what I went with. This took a couple of hours with a hired grinder, and ended in months of discomfort. I failed to recognise how much of an irritant concrete dust can be and, having done the job in September, I'm still suffering the consequences on my skin and scalp. Lesson learned here for sure!
 

Attachments

#27 ·
After recommendation from a couple of friends, I opted for Floorsavers Epoxy floor paint Epoxy Garage Floor Paint - 5L
For anyone else wondering, it really was as simple as mix it and roll it on. You do have a time limit but even in my garage, with 40m2 floor to paint, it only took an hour or so to roll on. The paint rolls on dead easy and spread pretty decent, I used the supplied roller kit with the 12" roller, but could easily have been done in similar timeframe with a standard 9".
 

Attachments

#28 ·
Next came the internal partition wall, which the builder fitted, along with the required opening for the planned sliding door. Once fitted came the laborious process of taping and filling which I took a crash course in courtesy of the builder. I'd never attempted plastering before, but with good tunes you soon get into a rhythm with it.
 

Attachments

#29 ·
3 coats to each joint around the workshop area before sanding and painting. I defaulted to white for the workshop, and after the three coats I was pleased with the finish. There were some wee bits around the ceiling where I could have done better but needed reminding that it is just a workshop area. Main area of the garage has had its first couple fill by this point as I focused on getting the garage ready for storage, and in doing so, emptying the shed, summer house and our wee storage hut. I've reused the bigdug storage units for this, although some of the shelves are worse for wear being stored in the shed along with 9 months of moisture. I'll likely replace these but they will do for now.
 

Attachments

#30 ·
We waited what felt like an eternity to get the rough casters too, between their availability and a decent weather window in the autumn, the inevitable rain and wind causing some chaos. The guys were highly recommended and were well worth the wait, completing a brilliant job over two visits and crucially a few weeks before the frosts arrived, allowing the exposed layers to be well on to being fully cured. In between visits the builders had to dig a good portion of the drive up to install the drains and the channel required to tie in the downpipes off the gutters. This involved the painful task of lifting the existing drain cover to get access to the drain pipes for the house.
Image

Image

Image

Image

Image

Image

Image

Image

Image

Image